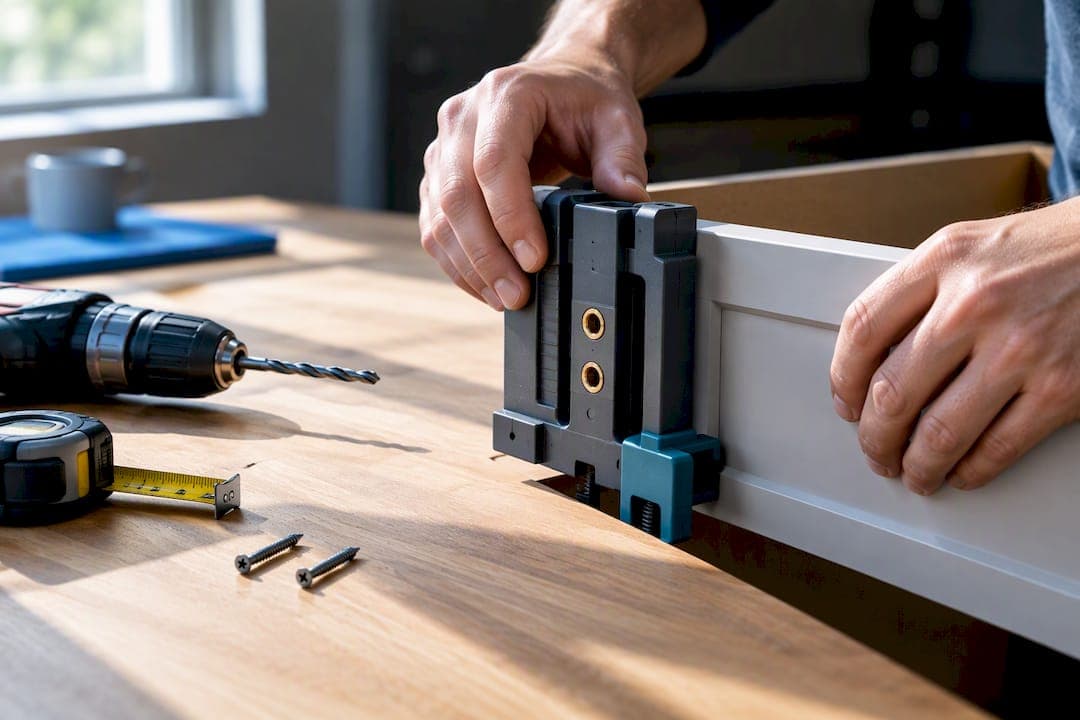
Place cabinet hardware on the opening side of the door, opposite the hinge, and use the drawer centerline for pulls. For knobs on framed doors, use a corner-offset or rail-based offset instead of guessing. Before you touch a drill, run a jig, back the panel with a scrap board, and test-fit with a dab of putty to confirm the spot looks right in person.
TL;DR:
- Using a jig and setting measurement stop-blocks ensures consistent hardware placement across all doors and drawers, minimizing errors and misalignments.
- Framed cabinet doors with knobs typically benefit from a 2 to 3 inch corner-offset placement, depending on door style and frame width.
- Wide drawers over 30 inches often require either a long, centered pull or two knobs placed according to the 1/3 rule for balanced appearance.
- Placement should consider cabinet style, with inset doors needing clearance for swing, frameless cabinets favoring centerline or shared line methods, and specialty doors requiring custom measurements.
- Matte black and warm metal finishes tend to be more forgiving of placement errors, while high-gloss finishes highlight misalignments and imperfections.
Table of Contents
- What Are the Basic Rules for Cabinet Handle Placement?
- How Should Placement Change by Cabinet Type?
- What's the Best Workflow for Measuring and Marking Hardware?
- What Tools Prevent Drilling Mistakes?
- How Do You Drill and Install Hardware Step by Step?
- What Mistakes Should You Watch For?
- How Do You Choose the Right Hardware Scale and Finish?
- How Does Cabinet Style Affect Hardware Placement?
- How Do You Place Hardware for Comfort and Accessibility?
- How Do You Handle Corner Cabinets and Specialty Doors?
- Does Hardware Finish Affect How Placement Looks?
- Does Handle Placement Affect Cleaning and Maintenance?
- An Installer's Take on Getting Placement Right the First Time
- How Best Cabinet Specialist Simplifies Your Hardware Plan
- Sources
- FAQ
What Are the Basic Rules for Cabinet Handle Placement?
Every reliable method for cabinet hardware placement comes down to four approaches: centerline, the 1/3 rule, the shared line, and corner-offset. Pick one system and stick with it across the whole kitchen or bathroom. Mixing methods door to door is the fastest way to end up with a run that looks slightly off, even if nobody in the room can say exactly why.
Centerline works best for standard drawer pulls. Find the exact horizontal middle of the drawer front, then center the pull on that line vertically too, unless you're intentionally raising it for grip. This is the default for most drawers under 24 inches wide, and it's the method The Home Woodworker recommends for classic, symmetrical layouts.
The 1/3 rule solves wide drawers and multi-knob layouts. Instead of one centered pull, divide the drawer width into thirds and place two knobs or pulls at the one-third and two-thirds marks. On a 36-inch drawer front, that puts hardware at roughly 12 inches and 24 inches from the left edge, giving you visual balance without a single oversized pull dominating the piece.
Corner-offset is the standard for framed cabinet doors with knobs. Rather than centering the knob on the door, you offset it a set distance from the rail (the horizontal frame piece) and stile (the vertical frame piece) nearest the opening edge. A typical offset runs 2 to 3 inches from each edge, though shaker-style doors with wider frames often look better closer to 3 inches.
Shared line placement keeps every knob or pull at the identical height across an entire run of cabinets, regardless of individual door height. It's the right call when you want the eye to travel in a clean horizontal band across uppers and lowers, and it beats individual centering whenever cabinet heights vary slightly, which happens more often than most people expect once cabinets are actually installed.
- Centerline: best for standard single-width drawers
- 1/3 rule: best for wide drawers or double-hardware layouts
- Corner-offset: best for framed doors with knobs
- Shared line: best for long runs where visual consistency matters more than per-door symmetry
How Should Placement Change by Cabinet Type?
A single rule rarely covers an entire kitchen, because uppers, base doors, and drawers each carry different reach and leverage needs.
Upper cabinet doors typically get hardware placed 2 to 3 inches up from the bottom corner, opposite the hinge. If crown molding sits close to the top of the cabinet, keep hardware low enough that it doesn't visually compete with the trim. Counter height doesn't affect upper placement directly, but it does affect how far you have to reach, so err toward the lower end of that range if the cabinets sit high.
Base cabinet doors generally take hardware 2 to 3 inches up from the top corner, opposite the hinge. Check clearance against the countertop overhang and any adjacent appliance handles. A pull that clears the counter by an inch on paper can still clip a countertop edge once the door swings, so test the actual door before drilling.
Standard drawers center the pull on the drawer face using the centerline method. On lower drawers you can shift the pull slightly above center, which improves leverage for anyone bending or reaching from a wheelchair, and this small adjustment is one of the easiest ergonomic wins in the whole project.

Wide drawers, generally 30 inches or wider, take either one long pull centered on the face or two knobs placed with the 1/3 rule. A 36-inch drawer front looks proportional with a 12-inch pull centered, or with two knobs set at the one-third marks.
Pantry doors, tall doors, and appliance panels need handle heights that work for the whole household, not just the tallest person in it. Long pulls mounted vertically, roughly 36 to 42 inches from the floor, keep tall doors comfortable to open without forcing an awkward reach up or down.
- Uppers: 2 to 3 inches from the bottom corner, opposite hinge
- Base doors: 2 to 3 inches from the top corner, opposite hinge
- Standard drawers: centered, or shifted slightly above center for leverage
- Wide drawers: one long pull centered, or two knobs via the 1/3 rule
- Tall doors and panels: vertical long pull around 36 to 42 inches from the floor
What's the Best Workflow for Measuring and Marking Hardware?
Cumulative error is the quiet killer of a good hardware installation. It's not one bad measurement that ruins a kitchen. It's a quarter-inch drift repeated across fifteen doors that suddenly becomes obvious the moment you step back.
Start by setting a master reference line if visual alignment across the whole run matters more than perfect symmetry, since a shared line hides small cabinet-height differences that individual centering exposes. Then work in this order:
- Install and align every door and drawer front first, before any hardware measuring begins.
- Choose your placement rule (centerline, 1/3, corner-offset, or shared line) and apply it consistently.
- Set your jig or stop-block to that exact measurement once.
- Test-fit with a small piece of putty pressed where the hole will go, then step back and look at it under real light.
- Mark and drill only after the test-fit looks right on at least two doors.
Reusing a single jig stop-block setting across the whole run is what separates a clean installation from a frustrating one. Set it once against a reference door, lock it down, and every subsequent hole matches without re-measuring. This single habit, borrowed from professional installers, does more to prevent crooked hardware than any tape measure trick.
Before you drill anything, run through a short checklist: hardware in hand and unboxed, countertops already installed if they affect clearance, correct drill bit sizes for your screw diameter, and a backer board ready to go behind every hole.
Pro Tip: Write your jig settings down on a sticky note and tape it to the jig itself. You'll thank yourself on day two when you can't remember whether you used 2 inches or 2 and a quarter.
For a deeper look at getting doors and drawer fronts squared up before hardware ever enters the picture, see this guide to measuring for new cabinet doors.
What Tools Prevent Drilling Mistakes?
A cabinet hardware jig is the single tool most likely to save a project from crooked, mismatched holes. Manufacturer instructions from True Position Tools walk through setting spacing pins and stops so every hole lands in the identical spot relative to the door edge, run after run. Kreg's jig documentation covers the same core idea with edge guides and marked scales for centerline alignment.
The backer board is the unsung hero of the whole process. Clamp a scrap piece of wood flat against the inside face of the door or drawer front before drilling, and the drill bit exits into that scrap instead of tearing out the finished veneer on the way through. Skip it, and you risk visible splintering on a door front you can't easily replace.
- Use a pilot bit first, then switch to the final bit sized for your screw
- Clamp the jig firmly before drilling; a jig that shifts mid-hole ruins the hole
- For long pulls, use a long-pull extension or a T-square to keep multiple holes on the same line
- Set your drill clutch low for final tightening so you don't strip the screw or crack the wood
Long pulls, generally anything over 12 inches center to center, exceed most standard jigs. True Position Tools and Kreg both build extensions specifically for this, keeping widely spaced holes aligned instead of relying on a tape measure and a hopeful eye.
Getting screw length right matters more than it sounds. A screw that's too long will punch through a thin drawer front; too short, and the hardware wobbles under normal use within a few months.
How Do You Drill and Install Hardware Step by Step?
Once your placement rule is chosen and your jig is set, the actual drilling process is short.
- Prepare: confirm the door or drawer is already installed and aligned, clamp your backer board in place, and double-check your hardware's screw length against the panel thickness.
- Mark: use the jig or your centerline marks to mark hole centers, then eyeball the door for symmetry before committing to the drill.
- Drill: start with a pilot hole, switch to the final bit, clear away debris, and test-fit the hardware dry before fastening anything.
- Fasten: attach with the correct screw length, tightening by hand or with the clutch set low to avoid over-driving.
- Check: step back and look across the whole run. Small misalignments are easier to catch and fix now than after every door is hung with hardware.
If a hole ends up slightly off, a dowel and wood glue can fill it cleanly enough to redrill an inch away, especially on painted or darker finishes where the repair disappears. On natural wood or light finishes, that same fix is more visible, so it's worth slowing down rather than rushing the last few doors in a run.
What Mistakes Should You Watch For?
The most common and most expensive mistake is drilling before doors and drawers are actually hung and aligned. A measurement taken on a door lying flat on a workbench doesn't always match how that door sits once it's on hinges, especially with inset doors where reveal gaps are tight.
Measure three times, not twice. It sounds excessive until you've drilled a hole a quarter-inch off center on the one door in the kitchen everyone sees first, according to the placement guidance in The Home Woodworker's drilling how-to.
- Skipping the backer board is the top cause of splintered veneer on the exit side of a drilled hole
- Using the wrong screw length either strips the wood or leaves hardware loose within weeks
- Changing placement rules mid-project creates a run that looks inconsistent even at a glance
- Forgetting to record your jig stop-block setting means re-measuring from scratch on the next door
Pro Tip: Press a small ball of putty where you think the hole should go, then walk to the other side of the room. What looks centered up close sometimes looks off from six feet away, and that's the distance most people will actually view your cabinets from.
If a hole is drilled in the wrong spot, a dowel filled with wood glue, sanded flush, and touched up with matching finish is usually enough to fix it. For a hole close to a door edge or a veneer that's already chipped, it's worth asking a cabinet professional rather than risking a second bad hole.
How Do You Choose the Right Hardware Scale and Finish?
Hardware that's the right size disappears into the design. Hardware that's the wrong size is the first thing anyone notices, even if they can't say why.
Knobs suit small doors and narrow drawers. Medium pulls, in the 3 to 6 inch range, fit standard drawers. Long pulls belong on wide drawers and tall panels, where a small knob would look lost against all that surface area.
- Small doors and narrow drawers: knobs
- Standard drawers: pulls in the 3 to 6 inch range
- Wide drawers and tall panels: long pulls, often 8 inches or larger
Pick one primary finish and stay disciplined about it. Trend reporting for 2026 recommends limiting mixed finishes to two across a single space, and keeping those finish families consistent from room to room rather than introducing a third metal tone in the bathroom.
Oversized pulls, warm metal and matte black pairings, and a revival of cup pulls are the styling notes worth watching this year. Applied with restraint, oversized hardware adds real grip and visual weight to larger drawers without overwhelming a smaller kitchen. For a broader look at coordinating tones across a whole space, this guide to cabinet hardware finishes is worth a read before you order.
Always test hardware on an actual door or a sample board before committing to a full order. Finish and scale that looked right on a screen or under store lighting can read completely differently under your own kitchen's daylight.

How Does Cabinet Style Affect Hardware Placement?
Shaker doors have wide, flat rails and stiles, which gives corner-offset placement more room to breathe. A 2.5 to 3 inch offset from both edges tends to look proportional on shaker frames, since the door's simple lines don't compete visually with the hardware.
Inset doors sit flush within the cabinet frame rather than overlapping it, and that flush fit means reveal gaps are tighter, often just an eighth of an inch on each side. Hardware placement itself doesn't change dramatically, but door swing clearance does. Confirm the door can open fully without the pull striking an adjacent frame or cabinet before you drill.
Frameless (also called full-overlay or European-style) cabinets have no face frame at all, which changes how offsets read visually. Without a rail or stile to offset from, corner-offset placement loses its reference point, and centerline or shared-line placement tends to work better on frameless doors and drawers. Because frameless doors typically overlap almost the entire cabinet box, there's also more usable surface area, which is part of why frameless kitchens lean toward slightly longer pulls than framed equivalents.
Whatever style you're working with, checking overlay type before finalizing hardware position avoids a common trap: assuming every door swings and clears the same way. A guide to cabinet door overlay is worth reviewing if you're not sure which category your doors fall into, since overlay type quietly drives several of the offset decisions above.
How Do You Place Hardware for Comfort and Accessibility?
Ergonomics is where cabinet hardware stops being purely visual and starts affecting daily use. The NKBA's planning guidelines set the industry reference for access and clearance standards professionals use when planning kitchens for a range of users, including those with limited mobility or reach.
Lower drawers benefit from pulls shifted slightly above dead center, since that small adjustment reduces how far someone has to bend to get a grip. It's a minor change on paper but a meaningful one for anyone with knee or back issues, or for a household with an aging resident.
Tall pantry doors and appliance panels should keep handles within a comfortable reach zone, generally between 34 and 48 inches from the floor for most adult users, rather than at the very top or bottom of the door where reaching becomes awkward.
Long pulls, mounted vertically on tall or wide surfaces, often work better than knobs for anyone with limited hand strength or dexterity, since a pull can be opened with a palm or forearm rather than requiring a precise pinch grip. This matters more than most kitchen planning guides mention, and it's worth considering even in a household with no current accessibility needs, since needs change over the life of a kitchen.
Ergonomic placement isn't a separate category from good design. It's the same measurements applied with a little more attention to who actually uses the space every day.
How Do You Handle Corner Cabinets and Specialty Doors?
Corner cabinets break the standard rules because the door itself often isn't a simple rectangle, and the opening side isn't always obvious at a glance.
For a standard blind corner cabinet with a single door, apply the same opposite-hinge logic as any base cabinet, placing hardware on the side farthest from the hinge. The challenge is clearance: corner doors often swing into a tighter space, so confirm the door opens fully before finalizing hole position, not after.
Lazy Susan and diagonal corner cabinets frequently use bifold or angled doors, which sometimes take two smaller pulls or knobs rather than one, positioned symmetrically on each door leaf. Measure both leaves independently rather than assuming they're identical, since factory tolerances on angled cabinets vary more than on standard boxes.
Specialty doors, glass-front cabinets, and integrated appliance panels each bring their own quirks. Glass-front doors often benefit from smaller, less visually heavy hardware since the glass itself already draws the eye. Appliance panels, especially on refrigerators and dishwashers built to look like cabinetry, usually need to match the vertical long-pull placement of surrounding tall cabinets rather than following standard door rules, so the whole run reads as one continuous design.
When in doubt on any non-standard door, test-fit with putty before drilling. It's a five-minute step that catches problems a tape measure alone won't reveal on an oddly shaped panel.
Does Hardware Finish Affect How Placement Looks?
Finish and material change how forgiving, or unforgiving, your placement really is. A high-gloss white door with brushed brass hardware shows every fingerprint and every slight misalignment, because the contrast between finish and hardware draws the eye directly to that spot.
Matte finishes, especially matte black, tend to hide minor imperfections better than polished chrome or brass. If you're worried about a slightly imperfect measurement on your first attempt, a matte finish gives you more room for error before anyone notices.
Wood tone also plays a role. Dark stained doors hide small drilling repairs (the dowel-and-glue fix mentioned earlier) far more effectively than light or natural finishes, where any patch is visible under close inspection. If your project involves a lot of trial and error, consider that when choosing between a light natural oak and a dark walnut stain.
Reflective finishes like polished nickel or chrome amplify symmetry errors because they catch light differently depending on the angle, making a slightly-off pull more noticeable across a run of cabinets than the same error would be in a warm brass or black finish. This is one more reason 2026's move toward matte black and warm metal pairings isn't just a style trend. It's also more forgiving for a DIY installation.
Does Handle Placement Affect Cleaning and Maintenance?
Where you put a handle affects how quickly it gets dirty and how easily you can clean around it. Hardware placed low on upper cabinets, closer to eye and hand level, picks up more everyday grease and fingerprints than hardware mounted higher, simply because it's touched more often during normal kitchen use.
Textured or heavily detailed hardware finishes, like hammered metal or deeply brushed textures, trap grime in the grooves more than smooth or polished surfaces. If the kitchen sees heavy daily cooking, a simpler profile is easier to wipe clean without needing a toothbrush in the crevices.
Long pulls mounted horizontally on drawers tend to collect dust along the top edge, while vertically mounted pulls on tall doors shed dust more easily since there's no flat horizontal surface for it to settle on. It's a small detail, but one that shows up as a maintenance difference over months of use, not days.
Placement near a stove or cooktop deserves extra thought. Hardware mounted too close to a range can accumulate grease splatter faster than hardware elsewhere in the kitchen, so a slightly higher or farther offset on cabinets flanking the cooktop can reduce how often that specific hardware needs wiping down.
An Installer's Take on Getting Placement Right the First Time
Most hardware mistakes I see aren't measurement errors. They're inconsistency errors, where someone measures carefully on the first door and then eyeballs the next twelve. A jig removes that temptation entirely, and the ten extra minutes it takes to set up pays for itself the moment you're on door number eight. A clean, consistent hardware layout also does something subtle: it makes the whole kitchen read as higher quality, even when the cabinets themselves are mid-range, because the eye reads precision as craftsmanship. Get the layout right, and there's one less item on the punch list at the end of the project.
— Nathan
How Best Cabinet Specialist Simplifies Your Hardware Plan
Getting hardware placement right is a lot easier when you're not also fighting warped doors, mismatched drawer fronts, or a six-week wait on replacement parts. Best Cabinet Specialist builds RTA and assembled cabinets with plywood boxes and solid wood doors, shipped fast so your placement plan doesn't sit on hold waiting for materials.

Project-ready construction means every door and drawer front arrives square and consistent, which is half the battle before a jig ever touches wood. Whether you're outfitting a full kitchen or a single bathroom vanity, choosing assembled cabinets built with soft-close hardware and shaker, classic, or slim-profile doors gives you a uniform base to apply any of the placement methods above with confidence. Some cabinet providers back every order with craftsmanship and reliability contractors and homeowners depend on for repeat projects. Browse the full cabinet lineup to see current styles and finishes, or reach out to the team directly to plan a hardware-ready order for your next renovation.
Sources
For technical accuracy beyond this guide, these references cover the standards and manufacturer methods behind the rules above:
- NKBA Kitchen and Bathroom Planning Guidelines with Access Standards
- True Position Tools Cabinet Hardware Jig Instructions
- Kreg cabinet hardware jig manual (KHI-PULL Global)
- Cabinet knob placement — The Home Woodworker
- Hardware trends for 2026 — MLD Blog
FAQ
What Is the 1/3 Rule for Cabinet Pulls?
The 1/3 rule places two pulls or knobs at the one-third and two-thirds marks across a wide drawer front, instead of one hardware piece centered in the middle. On a 36-inch drawer, that puts hardware at roughly 12 and 24 inches from the left edge, keeping the layout visually balanced without one oversized pull dominating the space.
What Are the Trends for Cabinet Pulls in 2026?
Current trend reporting points to oversized pulls, warm-metal and matte black pairings, and a revival of cup pulls as the styling notes worth watching this year. Limiting a kitchen to two hardware finishes, rather than three or more, remains the safest way to keep a mixed-metal look cohesive.
What Is the Rule for Cabinet Handles?
The core rule is to place hardware on the opening side of the door or drawer, opposite the hinge, and pick one measurement method (centerline, 1/3 rule, or corner-offset) and apply it consistently across the whole project. Consistency matters more than any single measurement, since a uniform run looks intentional even if the exact offset isn't identical to a factory catalog spec.
Where Do You Put Knobs Versus Pulls on Cabinets?
Knobs generally suit small doors and narrow drawers, where a single grip point is all that's needed, while pulls work better on wide drawers, tall pantry doors, and appliance panels that benefit from a longer grip surface. Framed doors typically use corner-offset placement for knobs, while drawers almost always use centerline or the 1/3 rule for pulls.